A PPR system that leaks is almost never a material failure. Polypropylene random copolymer does not corrode, and a correctly fused joint is one continuous piece of plastic rather than two parts held together. So when a pressure test drops, the cause sits in the installation: a weld heated for four seconds instead of eight, a hot line clamped rigid between two fixed points, a fitting whose socket depth does not match the pipe. This guide covers the ten PPR pipe installation mistakes behind the overwhelming majority of field leaks — what each looks like, why it fails, and the correction an installer or supervisor can apply the same day.
These are the errors that show up in hot-and-cold water plumbing across the Middle East, North Africa, Southern Europe and Latin America, where PPR is the mainstream domestic system. Every figure below is general industry guidance, not a WARMHAUS-specific specification — always confirm against the technical datasheet of the pipe, fitting and welding machine you are actually using before committing them to a live system.
I. The Welding Mistakes — Where Most Leaks Are Born
Roughly speaking, if a PPR system leaks in its first month, look at the joints before you look at anything else. Socket fusion is a controlled melt with three variables — temperature, time, and stillness — and each of the first four mistakes below breaks one of them.
I. Welding before the machine has reached working temperature
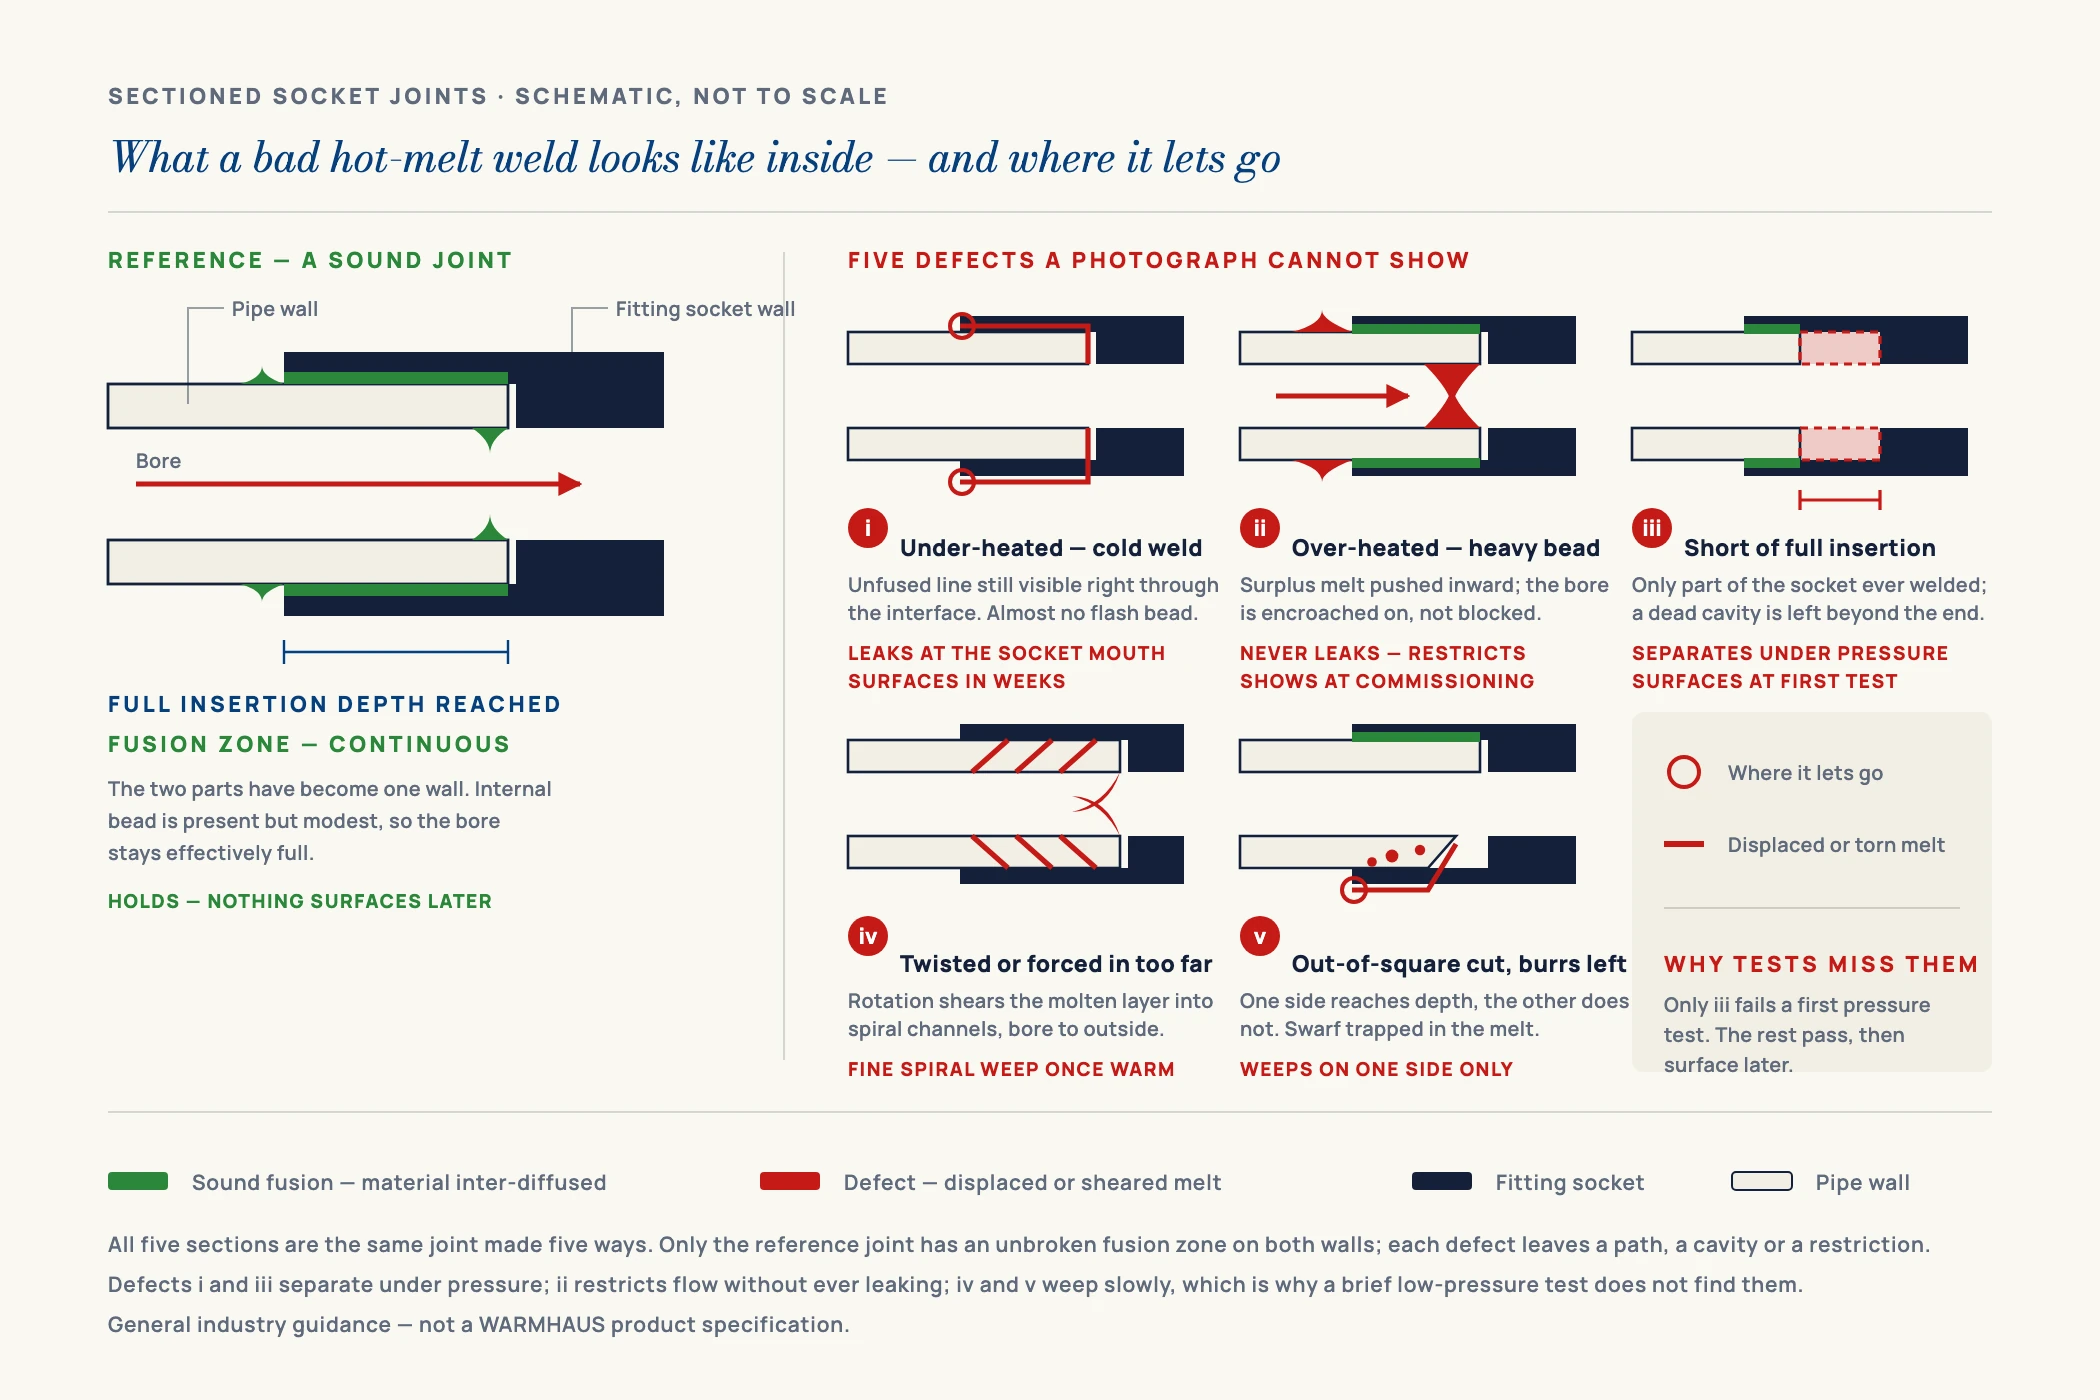
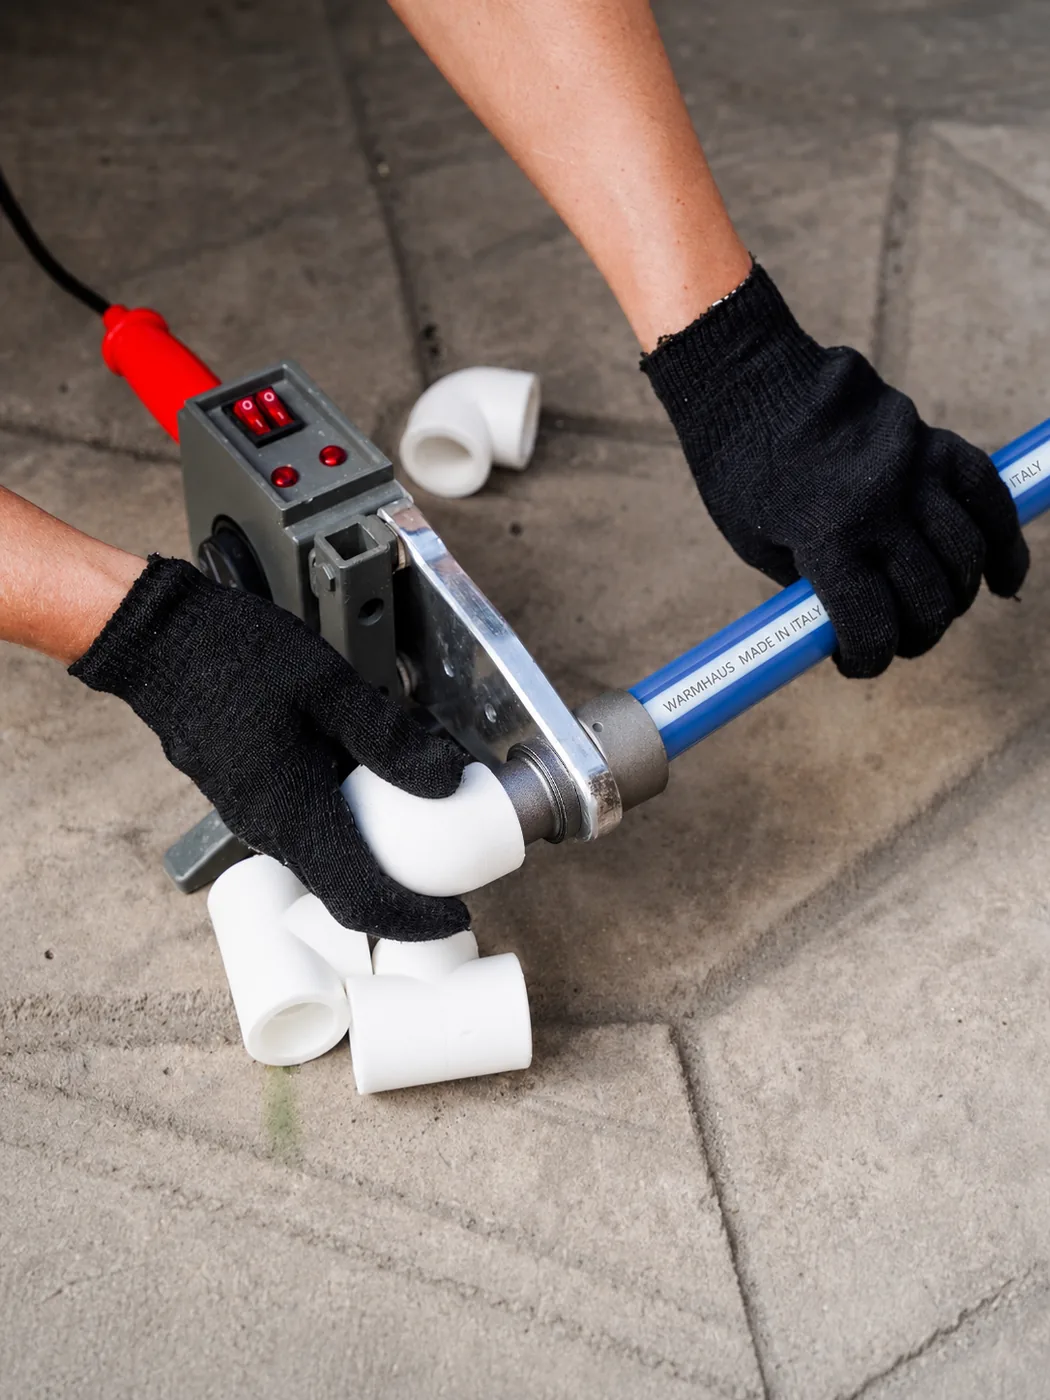
The machine’s indicator lamp cycles off once the element hits its setpoint, but the heating dies are a much larger thermal mass and lag behind it. An installer who starts welding at the first lamp change is fusing against dies still well under the working temperature of around 260 °C. The joint looks perfectly normal — fitting seated, flash bead present — but only the outermost skin of each surface ever softened. It holds during a short test and separates weeks later under thermal cycling.
The correction costs nothing: give the machine a genuine warm-up after the lamp first cycles, and verify die temperature rather than trusting the lamp. The full step-by-step method is set out in our PPR hot-melt welding guide.
II. Guessing the heating time instead of reading it by diameter
Heating time is not one number — it scales with wall thickness, which scales with diameter and PN class. An installer who has spent a year on 20 mm and 25 mm branch lines develops a rhythm of roughly five to seven seconds, then carries that rhythm onto a 50 mm riser that needs closer to eighteen. The 50 mm joint is then dramatically under-fused. The reverse error is real too, though it is worth being accurate about its scale. Over-heating pushes more material into the melt, and on insertion that surplus is displaced inward as a heavier internal bead — an encroachment on the bore rather than a blockage of it. A few extra seconds on a 20 mm socket does not close a bore; what it does is thicken the internal bead and, repeated across dozens of joints on a small-diameter branch, add up to a measurable restriction. Gross over-heating combined with over-insertion past the socket depth is what actually produces severe obstruction, and that is a different and more serious error than a slightly long count. Either way the defect does not leak, so it stays invisible until the system is commissioned and someone asks why the flow at the far fixture is poor.
III. Twisting the pipe into the fitting
Twisting feels correct — it is how you seat a threaded part. On a hot-melt socket it is destructive. Both surfaces are molten when they meet, so rotating one against the other shears the softened layer and cuts spiral channels through the fusion zone: continuous paths from bore to atmosphere. The joint may pass a brief low-pressure test, then weep steadily once the system is warm and pressurised. The rule is absolute — after the parts come off the dies, push straight in, one motion, no rotation of either part.
IV. Moving or pressure-testing the joint before it has cooled
The fused material needs to set into one continuous wall, and while it is setting it has almost no strength. Lifting the assembly onto a rack, tugging the line to reach the next bracket, or opening the test valve early all stress the weld while it is still soft, and it sets misaligned or internally cracked.
Here is the distinction that matters most, and the one most often collapsed into a single number: there are two separate intervals after a joint is made, not one. The first is the short fixing or handling time — a couple of minutes on small diameters — after which the joint may be released and the assembly handled gently. The second is the much longer full cooling time before the system may be pressurised, which is a different order of magnitude and is measured from the last joint made, not the first. Reading a two-minute figure off a fusion chart and then opening the test valve is precisely the failure this section warns against. Treat the chart below as handling times only; leave the system to cool fully and reach ambient before any pressure test, and take the required interval before testing from the pipe manufacturer’s instructions and the applicable local code. Cold ambient conditions lengthen both intervals, never shorten them.
II. Fusion Parameters by Diameter — General Industry Guidance
The table below is the reference the first four mistakes are measured against. Read your diameter across the row before every unfamiliar joint size, and mark the insertion depth on the pipe with a marker so full seating is something you can see rather than something you assume.
| Pipe Ø (mm) | Welding temp | Heating time | Insertion depth | Fixing time (handling only) | Typical use |
|---|---|---|---|---|---|
| 20 mm | ~260 °C | ~5 s | ~14 mm | ~2 min | Fixture branches |
| 25 mm | ~260 °C | ~7 s | ~16 mm | ~2 min | Bathroom / kitchen mains |
| 32 mm | ~260 °C | ~8 s | ~18 mm | ~4 min | Apartment supply |
| 40 mm | ~260 °C | ~12 s | ~20 mm | ~4 min | Floor distribution |
| 50 mm | ~260 °C | ~18 s | ~23 mm | ~4 min | Risers |
| 63 mm | ~260 °C | ~24 s | ~26 mm | ~6 min | Building mains |
Values are general industry guidance, not a WARMHAUS-specific specification. The fixing-time column is the interval before the joint may be released and handled — it is not clearance to pressurise. Full cooling before a pressure test is a separate and considerably longer interval, taken from the pipe manufacturer’s instructions and the applicable local code. Cold ambient temperatures lengthen heating, fixing and cooling alike, and thicker-walled higher-PN pipe may need slightly longer on the die. Always confirm against the printed datasheet supplied with the pipe and the welding machine you are using.
A correct hot-melt weld does not join two parts. It leaves one — which is exactly why the three variables that control the melt decide everything.
III. The Specification Mistakes — Wrong Part, Right Method
The next three errors are made before anyone picks up a welding machine. They are decisions about what to buy and what to put where, and they are more expensive than weld errors because they are distributed through the whole system rather than concentrated at one joint.
V. Using a cold-water pressure class on a hot line
PN ratings are nominal values referenced to water at 20 °C. They are not the pressure the pipe will hold at 70 °C. Polypropylene loses load-bearing capacity as temperature rises, so a class chosen on the cold-water number alone is being asked to do something it was never rated for once hot water runs through it. This is the classic cause of a system that behaves perfectly for a season and then starts failing at random points — the failures are not random, they are on the hot side. Specifying by service temperature and design life rather than by headline PN number is the fix, and the mechanics of derating — along with the ISO 10508 application classes that describe a service condition properly — are covered in our guide to PPR pipe pressure ratings and PN classes.
VI. Running plain PPR where the design needs fibre-reinforced pipe
Plain PPR has a relatively high coefficient of thermal expansion. On a long hot run this becomes a real dimensional problem rather than a theoretical one — the pipe visibly bows between supports and puts a bending load on every joint it is connected to. Fibre-reinforced (composite) PPR exists precisely to reduce that movement, which is why it is the normal choice for hot-water distribution and long horizontal runs. Substituting plain pipe to save cost on a heating circuit transfers the cost to the brackets, the joints, and eventually the ceiling below.
VII. Mixing pipe and fittings from different manufacturers
This is the mistake that is hardest to see and hardest to argue about. Socket fusion depends on an interference fit between pipe outside diameter and fitting socket bore, both softened to the same degree at the same moment. Two suppliers working to the same nominal standard can sit at opposite ends of the tolerance band and use resin grades with different melt behaviour. Put a loose-tolerance fitting on a tight-tolerance pipe and you get inconsistent flash, uneven fusion, and a joint population where a small percentage are marginal — enough to guarantee callbacks without any joint looking obviously wrong. Sourcing pipe and fittings from one production line removes the variable entirely.
IV. The Site Mistakes — Correct Parts, Wrong Handling
The last three errors happen after the parts arrive and before the walls close. They are the ones a supervisor can catch on a walk-through, which makes them the cheapest of all to prevent.
VIII. Rigid clamping with no allowance for thermal movement
A hot line expands. Clamped hard at both ends with nothing to absorb the change in length, that expansion goes into the joints and the pipe wall as compressive stress — showing up as bowing between supports, creaking as the system heats, and stress at the fittings. Use sliding supports where the pipe must move, fix anchors only where you intend to hold the line, and give long hot runs an offset, a loop, or the flexibility of a change of direction. Support spacing should also be closer on hot lines than cold, because the pipe softens slightly at service temperature and sags further between brackets — the spacing figures by diameter and water temperature are tabulated in our guide to PPR pipe clips and support spacing.
IX. Cutting with the wrong tool and skipping the deburr
A hacksaw leaves a ragged, out-of-square end and a scatter of swarf. Out-of-square means only part of the circumference reaches full insertion depth, so part of the joint is under-fused by geometry no matter how well the machine is set. Loose burrs end up as inclusions in the fusion zone or as debris in the bore heading for the nearest cartridge. Use a wheel-type pipe cutter, chamfer and deburr, and wipe both the pipe end and the socket with a dry, lint-free cloth immediately before heating — water, oil and dust all block a clean melt. The right cutting and welding tools for the diameters being installed are not an optional accessory; they are part of the joint specification.
X. Burying the system before a proper pressure test — and leaving it in UV
Two site habits, one consequence. Closing a chase or screeding a floor before the system has held a documented pressure test converts a fifteen-minute repair into demolition: test after the joints have fully cooled, hold long enough for a slow leak to reveal itself, and record the result before anything is covered. Separately, unprotected UV exposure is a genuine ageing mechanism for polypropylene, so pipe stored or installed in prolonged direct sunlight can degrade. How much depends on the product: UV resistance is a function of the stabiliser package and pigmentation compounded into the pipe, and material intended for exposed service is formulated for it, so grades are not equally vulnerable. What no buyer should do is assume the resistance is there. Treat unprotected outdoor exposure as a limit to be checked rather than a given — ask what the datasheet states for the specific grade, keep yard stock covered, and protect external runs unless the pipe is declared suitable for that duty. Our guide to PPR pipe storage and UV protection covers yard practice in detail.
V. Leak Diagnostic Table — Symptom to Cause
When a test fails, work from the symptom rather than from the beginning. This is the table to scan on site.
| What you see | Most likely cause | Mistake | Correction |
|---|---|---|---|
| Joint separates under pressure, weld faces look glossy but clean | Under-fusion — layers never inter-diffused | I, II | Verify die temperature; hold the full heating time for the diameter |
| Heavy internal bead, restricted flow at fixtures | Over-heating, or over-insertion past socket depth, encroaching on the bore | II | Do not exceed the heating time; remove from die on time; mark and respect insertion depth |
| Fine weep along a spiral path around the socket | Sheared melt layer from rotation on insertion | III | Push straight in, one motion, no twisting |
| Joint cracked or set out of alignment | Disturbed or pressurised while still soft | IV | Hold aligned and still for the full cooling time |
| Failures cluster on hot lines only, cold side sound | Pressure class chosen at 20 °C, not at service temperature | V | Specify by service temperature and design life |
| Pipe bows visibly between brackets when hot | Thermal expansion with no allowance, or plain pipe on a hot run | VI, VIII | Sliding supports and expansion allowance; fibre-reinforced pipe for hot lines |
| Inconsistent joint quality across one batch | Tolerance mismatch between pipe and fittings | VII | Source pipe and fittings from one matched system |
| Partial fusion around one side of the socket | Out-of-square cut, incomplete insertion | IX | Wheel cutter, chamfer, deburr, mark insertion depth |
| Chalky, brittle surface on exposed pipe | Prolonged UV exposure of a grade not compounded for it | X | Cover stored stock; protect external runs unless the grade is declared for exposed service |
Diagnostic guidance only. Failure modes can overlap, and site conditions vary — confirm against the datasheets for the specific pipe, fittings and machine in use, and follow the applicable local plumbing code.
VI. The Pre-Pressurisation Checklist
Everything above compresses into a short list. Run it before the test valve opens, not after.
Machine at working temperature, dies matched to diameter
Verified at the dies, not assumed from the indicator lamp. Dies clean and free of carbonised residue from previous welds.
Heating and fixing times read from the chart for each diameter
Not carried over from the last size welded. Longer on both counts in cold ambient conditions. Fixing time releases the joint for handling — full cooling before pressurisation is a separate, longer wait.
Every cut square, chamfered, deburred and wiped dry
Wheel cutter only. No water, oil or dust on either fusion surface at the moment of heating.
Insertion depth marked and reached, no rotation
The mark meets the socket face. Straight push, single motion, both parts held still until cool.
Pressure class and pipe type matched to service temperature
Hot lines specified at hot-line conditions. Fibre-reinforced pipe where expansion control matters.
Supports allow movement, anchors placed deliberately
Sliding supports on runs that expand, closer spacing on hot lines, expansion allowance on long straights.
Pipe and fittings from one system, test documented before covering
No mixed-supplier joints. Test held and recorded before any chase is closed or screed is poured.
VII. Fewer Variables, Fewer Callbacks
Six of these ten mistakes are technique and can be trained out in an afternoon. The other four — pressure class, pipe type, tolerance mismatch and tool fit — are decided at procurement, which is where a distributor or contractor actually controls the leak rate. The single most effective reduction available is to stop mixing sources: when the pipe, the fittings and the welding machine come from one manufacturer holding one internal tolerance, socket dimensions and melt behaviour stop being variables, and the joint population stops containing a marginal tail.
WARMHAUS is a manufacturer of PPR, PEX and brass piping systems, not a trading company. The extrusion, injection-moulding and machining lines are our own, which is why the PPR pipe range, the fitting range and the fusion tooling are dimensioned against each other rather than averaged across suppliers. Manufacturing since 1993, with raw material from Hyosung, Borealis and LG, ISO 9001 / ISO 14001 / ISO 45001 certified, EU CE marked and SGS tested. No MOQ, which matters when a distributor wants to trial a matched system across a few diameters before committing a full container. Standard lead time is 45 days on planned production slots.
Tell us the diameters and pressure classes your market installs, and we will send the PPR system specifications, the fitting schedule and distributor terms. Request the PPR system specifications and distributor terms Pricing, certificate documents and full technical datasheets: available on request.